tie dye instructions pdf
Welcome to the vibrant world of tie-dyeing! Our easy-to-follow PDF guide offers beginners essential instructions․ Learn this resist technique to create stunning designs like hearts, rainbows, and spirals․ Download your free tutorial now and begin․
Understanding the Basics of Tie-Dye as a Resist Technique
Tie-dye is fundamentally a resist technique, where fabric is strategically manipulated to prevent dye from reaching specific areas․ This blocking creates the distinctive patterns and designs characteristic of tie-dye art․ The core principle involves physically altering the fabric’s surface tension or creating barriers that resist dye penetration․ Common methods for achieving this resist effect include tying, knotting, folding, pleating, stitching, and scrunching the fabric․ Each technique produces unique results, from sharp lines to organic textures․ By restricting the dye’s access to certain sections, the un-dyed or less-dyed portions stand out against the colored areas․ This creates a fascinating interplay of color and negative space․ Essentially, you tie, then you dye, blocking desired areas․ This manipulation ensures that vibrant Procion-MX dyes, for example, only adhere where intended, leaving untouched portions as a contrast․ Techniques like Batik and Ikat are also related resist dyeing methods, sharing the underlying concept of preventing dye absorption in predetermined patterns․ Understanding this foundational resist principle is key to mastering various tie-dye designs and achieving brilliant, controlled outcomes on natural fiber fabrics like cotton or rayon, allowing for creative expression and personalized garments․ The fabric itself becomes part of the artistic process, shaping the final look through its folds and ties․
Key Advantages of Using Fiber Reactive Dyes like Procion-MX
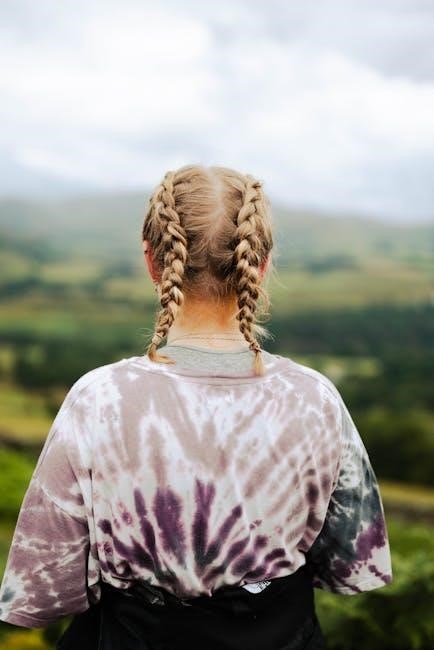
Utilizing fiber reactive dyes, such as Procion-MX, offers significant advantages for achieving brilliant tie-dye results, particularly on natural fiber fabrics․ These dyes chemically bond with cellulose fibers like cotton, rayon, hemp, linen, and ramie, ensuring exceptional colorfastness and vibrancy that resist fading over time․ Unlike other dye types, Procion-MX dyes become a permanent part of the fabric, leading to long-lasting, washable creations․ Their robust nature means colors remain bright and true, even after repeated laundering, a crucial aspect for any wearable art․
Furthermore, Procion-MX dyes are incredibly versatile․ They can be easily diluted to achieve a range of pastel shades or mixed to invent entirely new color palettes, giving artists extensive creative control․ Many tie-dye kits specifically feature Procion-MX dyes due to their reliability and user-friendly application, making them ideal for both beginners and experienced crafters․ While they can dye protein fibers like silk and wool, it’s important to note that colors might shift, and a true black can be challenging to achieve on these materials․ Overall, their superior color intensity, permanence, and adaptability make fiber reactive dyes the preferred choice for professional-quality tie-dye projects, ensuring your designs pop with enduring brilliance․
Essential Materials and Preparations
Embark on your creative tie-dye journey with confidence․ This crucial section outlines all fundamental requirements․ Master the necessary groundwork, from initial selections to essential preparatory steps, ensuring a smooth and successful artistic endeavor․
Choosing the Right Natural Fiber Fabrics
The success of your tie-dye project largely depends on selecting the appropriate fabric․ For vibrant and lasting results, natural fiber fabrics are unequivocally the best choice․ Materials such as cotton, rayon, hemp, linen, and ramie are highly recommended, as they readily absorb fiber-reactive dyes, leading to brilliant and true-to-shade colors․ These cellulose fibers are ideal for achieving the quintessential tie-dye aesthetic․
While protein fibers like silk and wool can also be tie-dyed, it’s crucial to understand their unique characteristics․ Fiber Reactive dyes, particularly Procion-MX, tend to interact differently with these materials․ This can result in a noticeable color shift, meaning the final hue might differ significantly from what you expect on cotton․ For instance, achieving a true black on silk or wool can be challenging, as the dye may appear as a muted shade or even a deep purple․ Therefore, if your goal is bold, predictable colors, especially for beginner projects, prioritize cellulose-based fabrics․ Always meticulously check the fabric composition to ensure optimal dye absorption and desired outcomes․ Choosing the right base material sets the foundation for a truly spectacular tie-dye creation․
Pre-Washing Fabric: Removing Sizing and Avoiding Softeners
Before diving into the colorful world of tie-dye, an essential preparatory step is pre-washing your chosen fabrics․ This crucial process ensures optimal dye absorption and contributes significantly to the vibrancy and longevity of your finished design․ New garments and fabrics frequently contain “sizing,” a starch-based finish applied during manufacturing to make them appear crisp and new․ However, this sizing acts as a resist, preventing the dye from penetrating the fibers evenly and deeply․ Failing to remove it can result in patchy, faded, or inconsistent color distribution, diminishing the quality of your tie-dye creation․
Equally important is to strictly avoid using fabric softeners or dryer sheets during this pre-wash․ These products deposit a chemical coating on the fabric fibers, designed to make them feel softer and reduce static․ Unfortunately, this coating also creates a barrier that actively repels the dye, much like sizing does, hindering the dye’s ability to bond properly with the fabric․ For the best results, wash your items in hot water, if suitable for the fabric, using a mild detergent but absolutely no fabric softener or dryer sheets․ A clean, unadulterated fabric surface is paramount for achieving bright, clear, and enduring tie-dye patterns․

List of Necessary Supplies: Kits, Protective Gear, and Tools
Assembling the right materials is crucial for a rewarding tie-dye project․ For ease, many beginners find all-inclusive tie-dye kits invaluable, as they typically contain fiber-reactive dyes, rubber bands, protective gloves, and often soda ash fixer—sufficient for several garments․ Alternatively, if purchasing components separately, Procion-MX dyes are highly recommended for their brilliant, long-lasting colors on natural fibers․ Personal protection is paramount: disposable gloves are indispensable for shielding hands from dye, and a large plastic sheet or drop cloth is essential to protect your work surface from stains․ Wearing old clothes or an apron is also wise․ For fabric manipulation, a generous assortment of rubber bands is fundamental for creating various patterns, while string or sinew can be used for more intricate ties․ Hemostats are also sometimes employed for precise fabric control․ Other necessities include squeeze bottles for accurate dye application, plastic bags or wrap for the dye setting phase, and paper towels for quick cleanups․ A 3 to 5-gallon bucket is useful for initial rinsing or preparing larger dye baths, ensuring a well-equipped crafting session․
Step-by-Step Tie-Dye Application Instructions
Master the art by following these instructions․ Begin with precise tying techniques, then prepare your vibrant dye solutions for application․ Carefully apply colors to your manipulated fabric․ Finally, ensure proper dye setting by allowing your creation to rest․
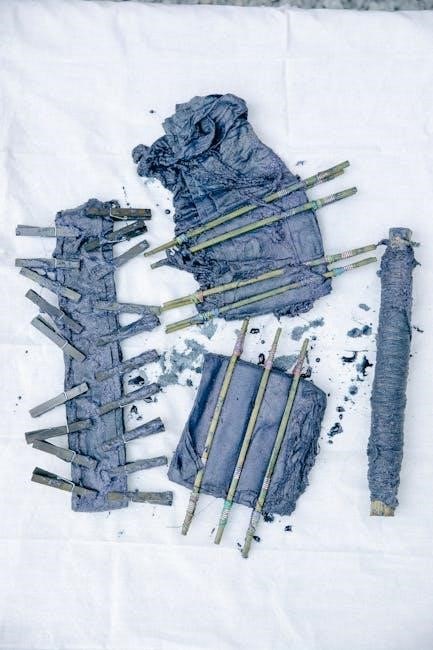
Techniques for Tying, Folding, and Manipulating Fabric
The essence of tie-dye lies in manipulating fabric to create unique resist patterns․ This foundational step involves various methods to block dye from reaching specific areas, ensuring vibrant, distinct designs․ As a resist technique, tie-dye allows creativity through actions like tying, folding, pleating, stitching, and scrunching․ These manipulations dictate dye penetration and resistance, forming your artistic expression․
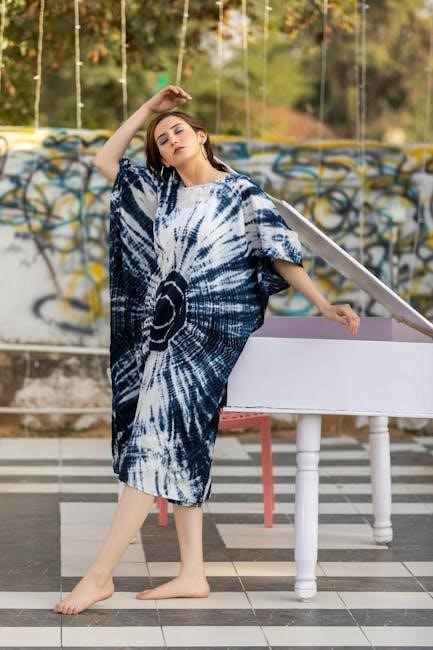
Beginners often master classic patterns like spirals, hearts, and the scrunch technique․ The spiral, a quintessential tie-dye design, is created by twisting fabric from a central point, securing it tightly with rubber bands․ Heart patterns are achieved through specific folding, typically folding fabric in half, drawing a half-heart, then gathering and tying․ The scrunch method involves crumpling fabric randomly and securing it, resulting in an organic, marbled effect․
Advanced techniques include the pleated V pattern or intricate mandala designs, often utilizing sinew or hemostats for precise binding․ Whether creating bold diagonal lines by folding quarters or subtle textures, your binding choices define the artistic outcome․ Experimentation with tying materials and tension unlocks a vast array of possibilities for unique projects․
Preparing Dye Solutions and Applying Colors
Preparing vibrant dye solutions is crucial for stunning tie-dye results․ Most kits, often featuring Procion-MX fiber reactive dyes, provide everything needed․ Meticulously dissolve dye powder in water, following package instructions for proper color development․ Dyes can be custom-mixed, expanding your palette with unique hues․ For softer aesthetics, dilute solutions with additional water, achieving pastel shades and varied intensity in your overall creation․
Once solutions are ready, apply colors to your pre-tied fabric․ This stage brings artistic vision to life․ Employing squeeze bottles, precisely apply distinct dye colors to designated sections․ For detailed patterns, apply smaller lines or triangles beside a primary color, repeating as desired․ Focus on even saturation in intended areas, appreciating the natural bleed and blending inherent to tie-dye․ The precision and method of dye application profoundly influence the ultimate design․
The Dye Setting Process: Resting in a Plastic Bag
Once the vibrant dyes have been meticulously applied to your tied fabric, the crucial dye setting process begins․ This step is paramount for ensuring the colors permanently bond with the fabric fibers, creating lasting and brilliant results․ Immediately after applying all desired colors, carefully place your entire tied-up fabric project into a plastic bag or wrap it securely with plastic wrap․ This enclosure is vital as it creates a humid environment, preventing the dyes from drying out too quickly and allowing the chemical reaction between the fiber-reactive dyes and the natural fibers to occur effectively․
Allow the fabric to rest undisturbed in the sealed plastic bag for a significant period․ The recommended duration is typically between 12 to 24 hours, with many experienced dyers suggesting a full 24-hour waiting time for optimal color saturation and fixation․ During this resting phase, the dyes are actively penetrating and reacting with the cellulose in cotton, rayon, or hemp, or the protein in silk․ Do not remove the fabric prematurely, as this can compromise the depth and vibrancy of your final tie-dye creation․

Post-Dyeing Care and Unveiling Your Creation
After the dye setting period, proper post-dyeing care is crucial for brilliant, lasting results; This section guides you through the exciting process of unveiling your unique tie-dye creation and ensuring its longevity with correct rinsing and washing․
Initial Rinsing Procedures for Tied Fabric
After allowing your tie-dyed fabric to sit for 12 to 24 hours in its plastic bag, the initial rinsing process begins․ It is crucial to keep the fabric tied up during this stage․ This prevents loose, unfixed dye from bleeding back into lighter areas, which could muddy your vibrant design and diminish its clarity․
First, place your tied garment under a stream of cold running water․ Rinse thoroughly, gently squeezing the fabric, until the water running off appears clear․ This cold water rinse helps to set the dyes into the fibers and washes away the majority of unbonded dye particles, preventing premature color bleeding and ensuring color fastness․
Once the cold water rinse consistently yields clear runoff, gradually increase the water temperature to warm․ Continue rinsing under warm running water, maintaining the tied state, until the water flowing from the garment runs truly clear․ This final warm rinse flushes out any remaining excess dye that might have clung to the fibers․ The goal is to see no color whatsoever in the runoff before untying your masterpiece, ensuring its lasting vibrancy and crispness․

Final Washing and Drying for Longevity
Once your tie-dyed creation is thoroughly rinsed and the water runs completely clear, it’s time for crucial final washing and drying to ensure its longevity․ Carefully untie your fabric, unfolding it to reveal the vibrant patterns․ For the first machine wash, it’s highly recommended to wash your tie-dyed item separately․ This captures any minuscule residual dye, preventing transfer to other garments․ Use a mild laundry detergent and wash on a cold cycle․ Cold water preserves dye intensity and prevents excessive fading, keeping colors bright for a longer time․
For subsequent washes, you can wash your tie-dyed item with like colors, using cold water cycles․ When drying, air-drying your tie-dye is ideal․ Hang it away from direct sunlight to maintain color vibrancy․ If using a dryer, select a low heat setting, as high heat causes dyes to fade more quickly over time․ Following these steps ensures your tie-dye masterpiece remains brilliant and beautiful through many wears and washes․
Popular Tie-Dye Patterns: Spirals, Hearts, and Scrunch
Diving into tie-dye offers a world of creative patterns, with spirals, hearts, and scrunch being among the most popular and rewarding, especially for beginners․ The spiral pattern is often considered the quintessential tie-dye design; it’s what most people envision when thinking of this art form․ Achieving a vibrant spiral involves pinching the fabric at the center and twisting it until it forms a flat disc, then securing it with rubber bands to create sections for different colors․ Our PDF tutorial guides you through making stunning spirals․
For those looking to express affection or add a sweet touch, the heart pattern is a fantastic choice․ Creating the perfect tie-dye heart shirt often involves specific folding techniques, such as folding the damp shirt lengthwise in half before drawing half a heart and pleating along the line․ This method ensures a symmetrical and charming result․ Finally, the scrunch technique is incredibly versatile and easy, making it perfect for first-timers․ Simply scrunch your fabric loosely or tightly, then secure it randomly with rubber bands․ This creates a beautifully organic, marbled effect, allowing for unique color blending and unpredictable outcomes․ These patterns provide excellent starting points for exploring the endless possibilities of tie-dye art․